

How to Choose Exterior Materials for a Charlotte Custom Home: 7 Decisions
By Max Built
9 min read
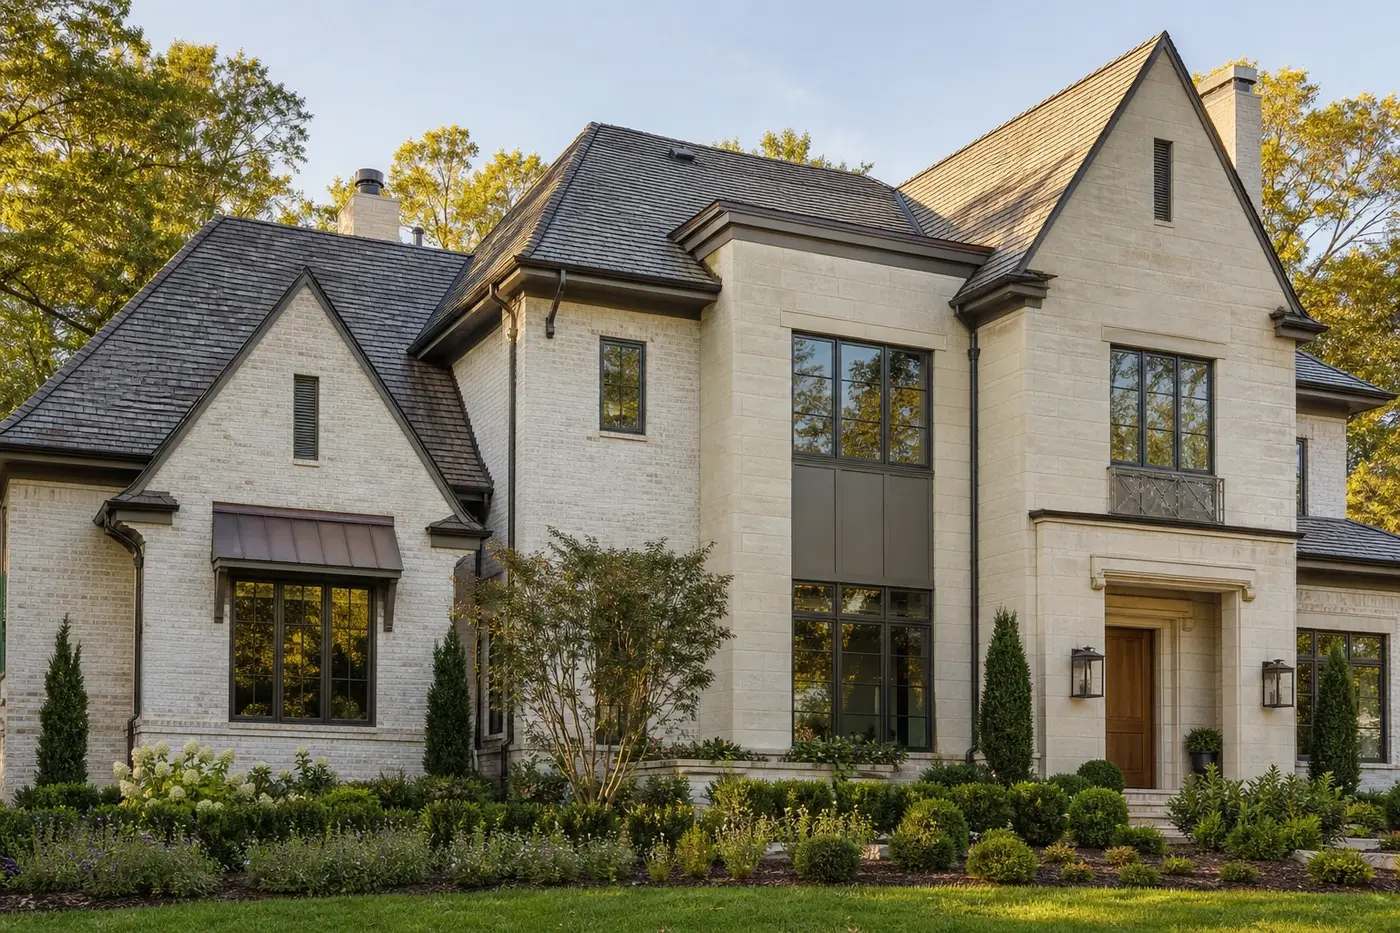
Choose exterior materials as one architectural system. Start with the home's form and the actual property, then limit the palette to a few materials with clear jobs. Study every corner, opening, roof edge, and ground connection before approving colors. Large samples should be viewed together in changing daylight, and the final choices should account for installation details, weather exposure, maintenance, and how the materials will age. The strongest exterior rarely has the most finishes. It has the clearest relationships between them.
Planning a new home? Explore Max Built's custom-home process, then view the craftsmanship in our project portfolio.
1. Let the architecture lead the material palette
Materials should clarify the house, not compete with it. Begin by reading the main volumes, roof forms, openings, entry, and connection to the landscape. A masonry base can make a tall volume feel grounded. A quieter wall material can let a detailed entry or deep window opening carry more emphasis. When every elevation receives the same number of visual moves, the home often loses its hierarchy.
Ask the design team to identify the primary material, the supporting material, and the accent before selecting exact colors. Give each one a purpose. The primary material may wrap most of the home. The supporting material may define important volumes or areas close to the garden. Metal or wood can mark entries, roof edges, or recessed outdoor spaces. If a fourth material is proposed, it should solve a real architectural need—not just fill an empty area in a rendering.
This order matters because color boards can be persuasive. A beautiful sample does not automatically belong on the house. First decide where the architecture needs weight, warmth, shadow, or contrast. Then find the material that does that job well.
- Which volume should feel most grounded or permanent?
- Where should the entry be obvious without oversized decoration?
- Which material can turn corners cleanly instead of becoming a front-only veneer?
- Can the palette be explained in one short sentence?
2. Test the palette on the property and in real light
The same pale brick can look warm beside mature trees and cool under open sky. Deep bronze may read nearly black on a shaded wall but soften in late sun. Stone changes again when it is wet. That is why exterior selections should be tested where the home will stand, not approved only under showroom lighting or on a bright screen.
Place larger samples in more than one orientation. Look at them in the morning, at midday, and near sunset. Set masonry beside the proposed window finish, roof sample, metal flashing, wood tone, and exterior paint. Then step back. The useful question is not whether each sample is attractive by itself. It is whether they still feel related when light changes and one material occupies far more visual area than another.
The property also supplies a color context. Bark, evergreen foliage, red clay, dry grass, neighboring roofs, and long seasonal shadows all affect what the eye sees. The goal is not to camouflage the house. It is to keep the palette from feeling disconnected from the place chosen for it.
3. Compare complete wall assemblies, not material names
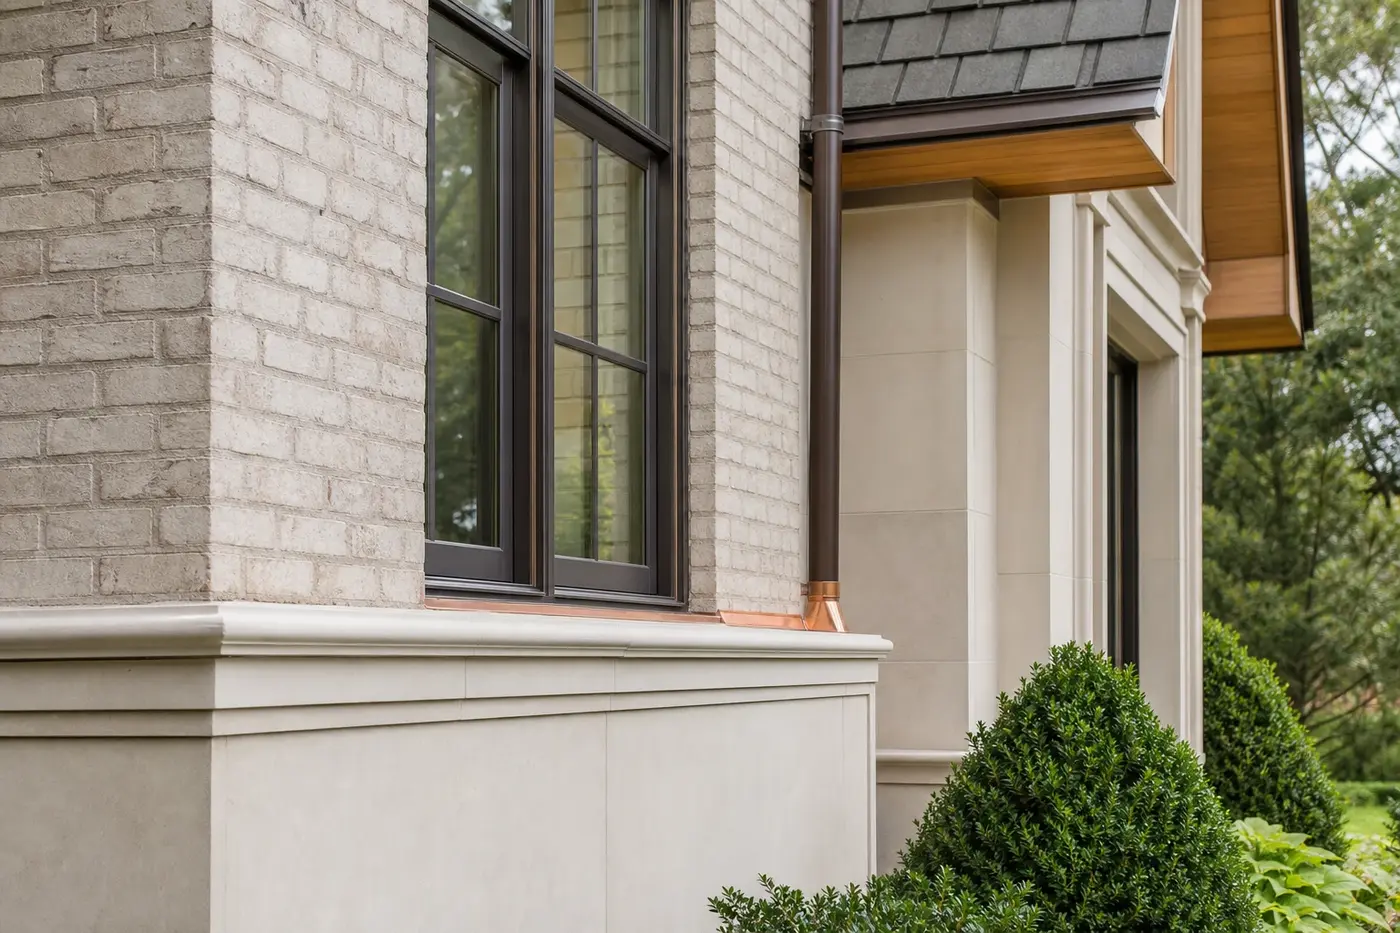
‘Brick and stone’ is not a specification. Brick has size, texture, mortar color, joint profile, corner conditions, and opening details. Stone may be full-depth or part of another approved wall assembly, with its own supports, caps, drainage, and transitions. Wood needs a species or product, finish, fastening approach, ventilation strategy, and realistic exposure. The technical assembly shapes the finished appearance.
Ask to see an enlarged wall section and key exterior details before the palette is final. How deep will the window sit? Where does water leave the sill? What caps the stone? How does the roof edge meet a masonry wall? Where can flashing be integrated quietly rather than added as a visible afterthought? These decisions reveal whether two materials truly work together.
A material that looks simple in a rendering may create several awkward cuts at corners and openings. Another may allow clean returns, consistent coursing, and durable edges. Compare those realities early. Good detailing does not make the exterior busier—it removes the visual noise created by unresolved junctions.
4. Decide exactly where each material begins and ends
Material transitions look most natural when they follow the architecture. An inside corner, a change in wall depth, a roof line, a porch recess, or a clear base can give one finish a believable stopping point. A random vertical line across a flat elevation usually reads as a surface change rather than part of the building.
Walk around every elevation in sequence. A front view can hide what happens at the side, and a side view can hide a narrow return that becomes obvious from the garden. Trace each material around corners and through recessed areas. Check how it meets windows, doors, porch ceilings, foundation walls, roof edges, terraces, steps, and grade. If the team cannot draw the transition clearly, the field should not be expected to invent it gracefully.
Pay special attention to small leftover zones. A thin strip above a window, a short wall beside a door, or an exposed sliver under a roof can force an unexpected material change. Resolving those areas may require adjusting an opening, aligning a joint, changing a trim depth, or simplifying the number of finishes. Tiny decisions can clean up an entire elevation.
5. Coordinate roofing, windows, gutters, and exterior metals
Roofing and windows occupy large areas, so they belong in the core palette—not on a separate checklist. Dark window frames do not automatically require every metal item to match exactly. Roof panels, gutters, downspouts, flashing, railings, exterior lights, and hardware have different textures and levels of visibility. They need a deliberate relationship, not a collection of near-matches chosen at different times.
Build a metal schedule with actual finish samples where possible. Decide which elements should disappear into the wall or roof and which may act as a controlled accent. Check sheen as carefully as color. A glossy component can stand out sharply beside a matte window frame even when both are called bronze.
Also study the roof from the ground. Valleys, low roof edges, downspouts, parapets where applicable, and transitions between roofing types can become prominent lines. Their placement should support the composition and move water predictably. A calm elevation depends as much on those working parts as it does on the masonry selected for the main wall.
6. Carry the palette around the whole home
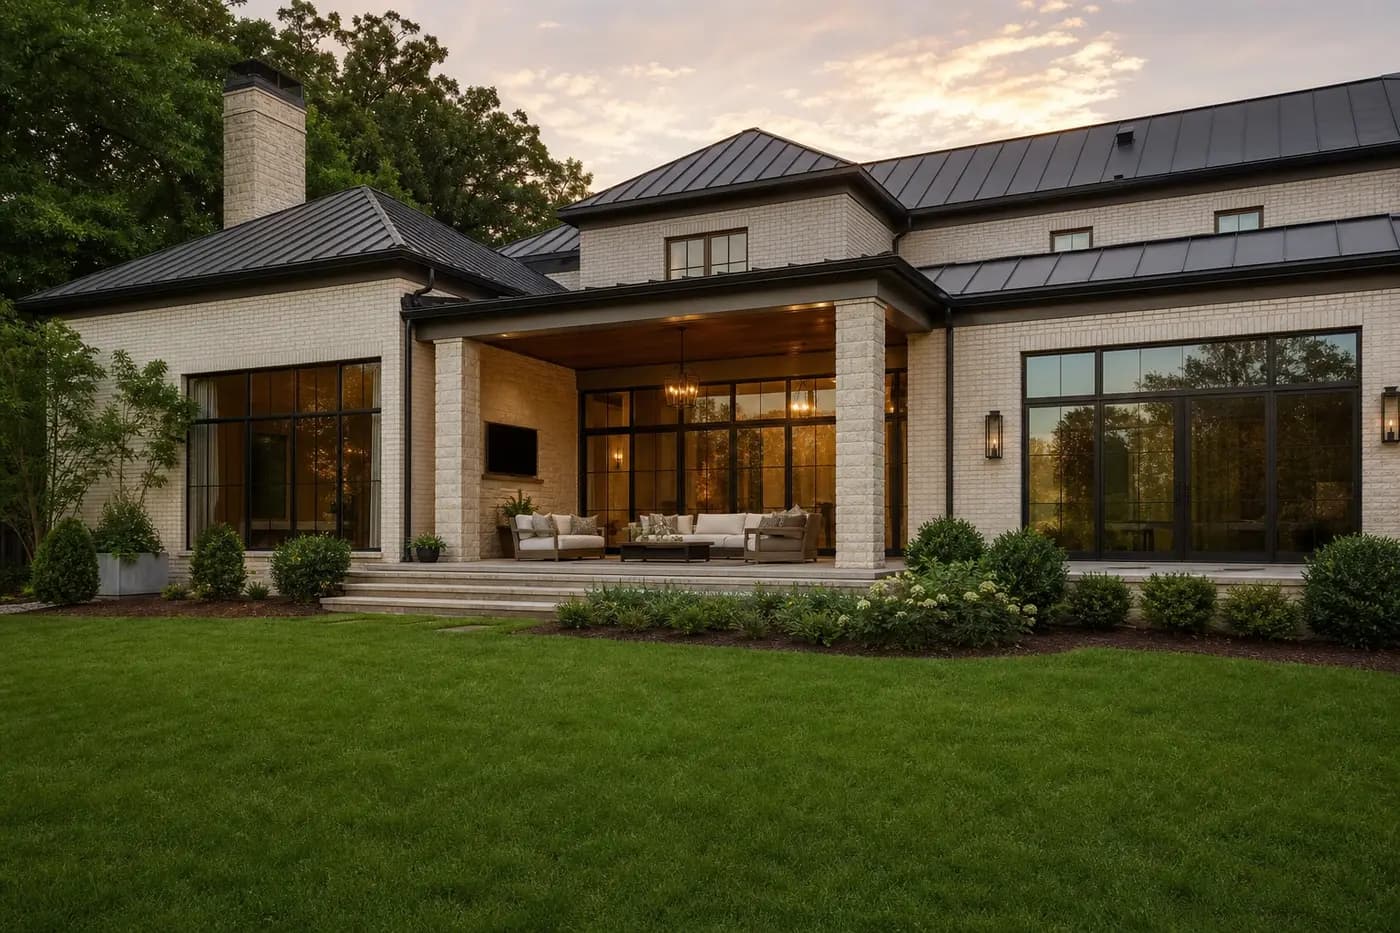
A cohesive exterior should not have one polished front and a disconnected rear. The garden elevation, covered outdoor rooms, service side, and secondary entries all belong to the same architecture. The mix may shift—wood could become more present beneath a protected terrace, for example—but the underlying materials and proportions should remain related.
This is especially important where interior rooms open to the outside. Flooring levels, door frames, columns, ceiling finishes, masonry, steps, and landscape edges occupy one view. If each was selected in isolation, the threshold can feel crowded. If they share a short palette and aligned details, the transition feels generous even without adding decorative features.
Review exterior elevations and key interior-to-garden views together. The home should feel intentional when approached from the street side, seen from the lawn, or viewed through a large glass opening from inside. Consistency does not mean repetition everywhere. It means each variation belongs to the same family.
7. Use mockups to judge craft, aging, and care
A physical mockup answers questions that drawings and small samples cannot. It can show the real mortar joint, the cut at a corner, the depth of a sill, the meeting of stone and brick, the window finish in shadow, and the way water sheds from a cap or flashing. Place the mockup outdoors and review it from several distances. Close inspection reveals craft; a longer view reveals whether the colors and proportions settle into one composition.
Use the same review to discuss aging. Natural materials change, coatings weather, sealants require attention, and exposed wood asks for a care plan. Ask what normal variation looks like, which surfaces will receive the most sun and water, how replacement pieces can be sourced, and what access future care will require. The honest answer may reinforce a choice or point toward a more suitable material for a difficult exposure.
Before ordering, create one approved exterior schedule tied to the drawings and details. Include product, color, finish, pattern, mortar, joint, edge, location, and approved sample or mockup reference. Then keep it current. For homeowners planning a Charlotte custom home, this is where early coordination with the architect and builder pays off: the design idea, working assembly, and final installation stay connected from the first palette discussion through the completed home.
Exterior material planning for a Charlotte custom home
How many exterior materials should a custom home use?
There is no universal number, but a primary material, one supporting material, and a limited accent are often enough to create hierarchy. Add another finish only when it has a clear architectural job and a clean place to begin and end.
Should exterior materials match neighboring Charlotte homes?
The new home should respond respectfully to its setting without copying it. Study neighboring scale, roof color, masonry tones, landscape, and street rhythm, then develop a palette that belongs to the property and the home's own architecture.
When should exterior materials be selected during custom-home design?
Begin the palette during design development, while wall depths, openings, roof edges, and transitions can still be adjusted. Final products and details should be coordinated before ordering and before the relevant wall and roof assemblies are built.
Why are large exterior samples important?
Small chips hide texture, joint pattern, sheen, and natural variation. Larger outdoor samples show how materials relate across a meaningful area and how the combination changes in sun, shade, and wet conditions.
What should an exterior material mockup include?
Include the most important real junctions: primary masonry, mortar and joint, window frame and sill, supporting material, flashing or cap, trim, and any nearby wood or metal. Build it with the proposed installation details, not as a decorative sample board.
Build the right plan before construction begins
Tell us about your property, priorities, and the way you want to live. We'll help organize the next decisions around a clear, buildable path.